WEBHELP
Network Options
Enable incoming port
This is the port that's used for the rfb data
Enable Java Port
This is the port used by the building webserver used to serve the java applet
Allow Loopback connections
Loopback connections are connection on the same PC. Server and viewer running on
the same PC. Loopback ip address = 127.0.0.1)
LoopbackOnly
Only allow loopback connections, external connections are refused
You can use the same port for rfb and java by manual settings the same port.
Sample: rfb port=80/http port=80 )
UPnP
UPnP
Allow you to set and extract information from your nat router.
To activate this option you manual need set a rfb port.
NAT-PMP and Universal Plug And Play (UPnP) are technologies that allow, among other things, Internet applications to configure home routers and gateways, bypassing manual port forwarding configuration. To take advantage of these methods, you must have NAT-PMP or UPnP capable hardware.
How to enable UPnP in Windows
Windows 7 users
To enable UPnP in Windows 7, start by going to the Windows Control Panel.
Locate and click on the icon for Network and Sharing Center.
In the left pane, click the link for Change advanced sharing
settings.
In the Network Discovery section, select the option for
Turn on network discovery and click the Save changes button.
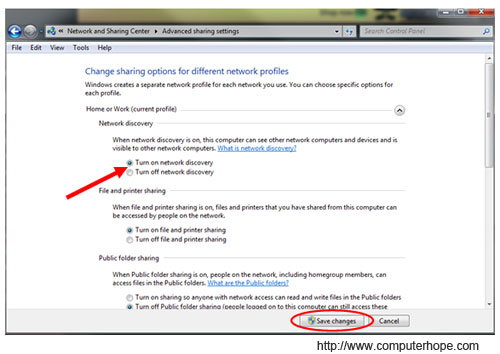
UPnP will now automatically start when you turn on your
computer.
Tip: If you're having issues getting
UPnP to work properly on your network after following the steps below, make sure
there is not a firmware update for your
router that addresses any UPnP issues.
Windows Vista users
To enable UPnP in Windows Vista, start by going to the Windows
Control Panel.
Locate and click the icon for Network and Sharing Center.
In the Sharing and Discovery section, click on the arrow
button to the right of the Network discovery option. Select the
option for Turn on network discovery and click the Apply button.
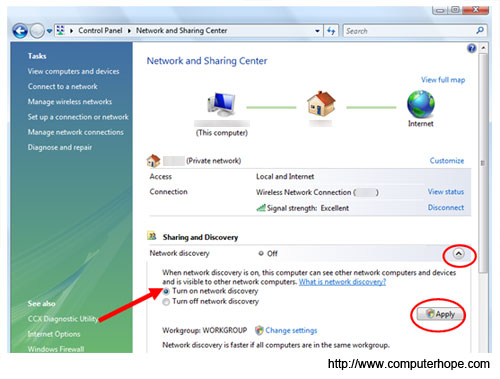
UPnP will now automatically start when you turn on your
computer.
Tip: If you're having issues getting
UPnP to work properly on your network after following the steps below, make sure
there is not a firmware update for your
router that addresses any UPnP issues.
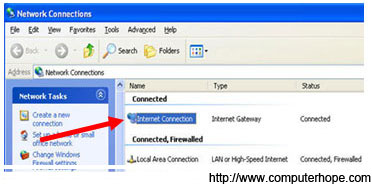
Windows XP users
For UPnP to work in Windows XP, you need to first make sure the
Internet Gateway device appears in Network Connections and that your router
appears in My Network Places.
For the first device, open up the Network Connections window.
You can do this by going to Start,
Run, and type ncpa.cpl in the text field, then press the Enter key. Check
to see if the Internet Gateway device is displayed, as shown below.
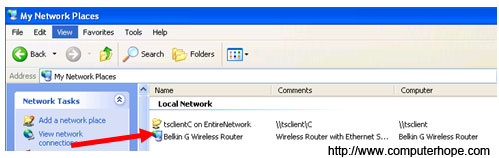
For the second device, click the link for My Network Places in
the Network Connections window (left pane, Other Places section). Check to see
if your router is
displayed.
If these devices are not displayed, you need to make sure the
correct components are installed in Windows XP. To check this, go to Start, Run,
type appwiz.cpl in the text field, and press the Enter key.
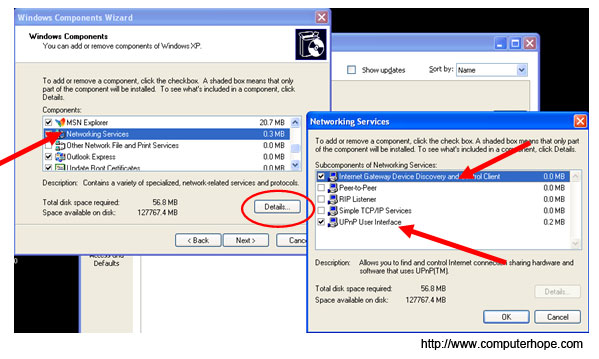
In the Add or Remove Programs window, click on the Add/Remove
Windows Components link in the left pane. In the Windows Components Wizard
window, scroll down until you find Networking Services. Select this in
the list and click the Details button. Make sure the Internet Gateway
Device Discovery and Control Client and UPnP User Interface options
are checked and click the OK button. Back on the Windows Components Wizard
window, click the Next button and follow the directions to install the new
components.
Now, you can start the UPnP service to enable it. To do this, go
to Start, Run, type services.msc in the text field, and press the Enter
key.
Find the SSDP Discovery Service option and double-click
it with your mouse. In the window that opens, on the General tab, select
Automatic in the Startup type drop-down list and click the OK button.
UPnP will now automatically start when you turn on your
computer.
|