PcHelpWare
Easy & secure remote access from anywhere
PcHelpWare is a free alternative to the various comercial remote assistance services that can be found on the net.
PcHelpWare is a powerful remote support software that allows you to control (right from your own PC) a distant PC connected to the internet. It is the ideal solution to provide quick remote assistance and help your customers, colleagues, friends and family members, even if they are on the other side of the world.
PcHelpWare is customizable: you can create your own server package with your logo and -company- name.
The individual you want to remotely assist only has to download and execute your customized package. That's all.
No router/modem/firewall configuration is needed to access a remote PC even when it's standing on a protected network behind a NAT.
If your PC is also behind Firewall/NAT routers, PcHelpWare has the solution that makes everything simple anyway.
Using the provided Repeater service, no router configuration is needed at all.
Key features
- Security: Build-in communication encryption (TWF 256) and DH key exchange (using a 512 prime)
- File transfer (using clipboard style Copy/Paste : CTRL+ALT+C, CTRL+ALT+V)
- Text Chat
- Clipboard transfer (Text, RTF, HTML, pictures)
- Scalable and easy to use Viewer. Various color modes to fit bandwidth at best
- International keyboard support
- Additional password if wanted
Viewer requirements
(The Viewer is used to provide remote support and controls the remote PC once connected)
- Microsoft Windows 95, 98, ME, 2000, Server 2003, XP, Vista, 7, 8, 8.1, 10
- Microsoft DirectX 9.0c
Server requirements
(The server is the application that runs on the remote machine to be controlled)
- Microsoft Windows 95, 98, ME, 2000, 2003, XP, Vista*
- For optimal performances an optional Mirror Driver can be installed on Windows 2000/2003/XP/Vista
* Windows Vista UAC temporarily disables the remote keyboard when asking for administrator access.
This new security feature in Vista locks all applications when asking the user for this access level. It can be disabled it in Windows Vista...
Connection without Repeater
The PcHelpWare remote server initiates the connection to your Viewer. Thus the Viewer needs to be reachable from outside (the internet). If you are behind a router you have to configure it so the viewer port is forwarded to your machine. But no configuration is needed on server (remote) side.
Connection through Repeater
When using the Repeater, both the Server and Viewer can stand behind a NAT firewall/router without having to configure ports forwarding. A Repeater is most time available on the UltraVNC Server.
Connection ports
The server use one outgoing port (default port = 5500).
The viewer use one outgoing port (default = 5901) and one incoming port (same than server default port = 5500).
License
What has PcHelpWare in common with UltraVNC SC (Single Click)?
PcHelpWare has been made compatible with the helpdesk.txt (UltraVNC SC custom.zip file). But internally, all has been rewritten from scratch to be able to easily handle encryption, unicode and intel performance libraries. PcHelpWare capture, display and communication engine comes from a commercial real time remote screen application... it has his own protocol and is not compatible with UltraVNC or any other VNC flavor.
To use PcHelpWare you need to use both its server and viewer.
> Global PcHelpWare SC connectivity scheme: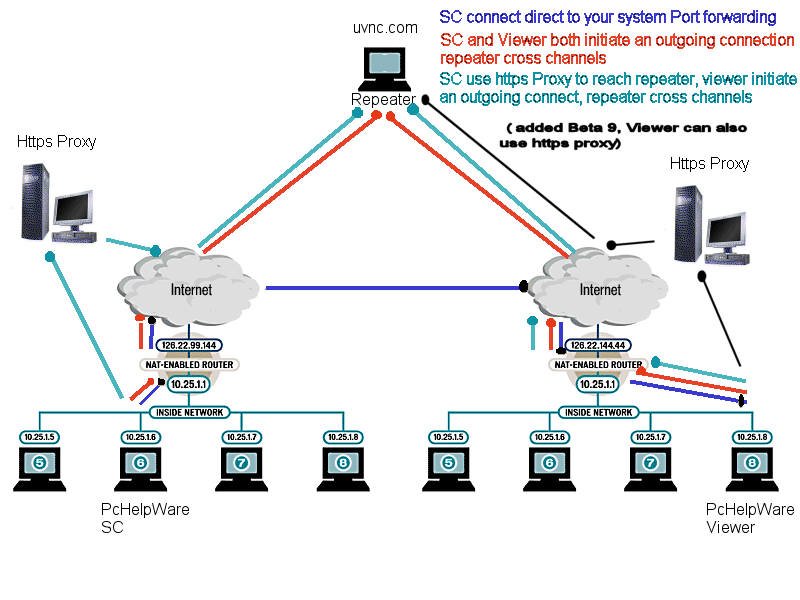
> Login screen:
> Controls remote PC desktop viewed through the connected Viewer: